- Extreme Networks
- Community List
- Wireless
- ExtremeWireless (IQE)
- Problems with the CLI Config
- Subscribe to RSS Feed
- Mark Topic as New
- Mark Topic as Read
- Float this Topic for Current User
- Bookmark
- Subscribe
- Mute
- Printer Friendly Page
Problems with the CLI Config
Problems with the CLI Config
- Mark as New
- Bookmark
- Subscribe
- Mute
- Subscribe to RSS Feed
- Get Direct Link
- Report Inappropriate Content
12-03-2021 02:07 PM
no capwap client enable
security-object Wifi1
security-object Wifi1 security protocol-suite wpa2-aes-psk ascii-key xxxxxxx
security-object Wifi1 default-user-profile-attr 30
security-object Wifi2
security-object Wifi2 security protocol-suite wpa2-aes-psk ascii-key xxxxxx
security-object Wifi2 default-user-profile-attr 31
ssid THEHIVE1
ssid THEHIVE1 security-object Wifi1
ssid THEHIVE2
ssid THEHIVE2 security-object Wifi2
hive TRONS-HIVE
hive TRONS-HIVE password xxxxxxxxx
interface wifi0.1 ssid THEHIVE1 interface wifi1.2 ssid THEHIVE1
interface wifi0.2 ssid THEHIVE2
interface wifi1.3 ssid THEHIVE2
interface mgt0 hive TRONS-HIVE
user-profile Wifi1 qos-policy def-user-qos vlan-id 30 attribute 30
user-profile Wifi2 qos-policy def-user-qos vlan-id 31 attribute 31
interface wifi1 radio channel 44
hostname TRONSHIVE-AP1
save config
From this point on I have difficulties what to do. How do I have to wire it.
I have a switch that is connected to my router on the switch I have ETH1 and power I get via power cable POE.
Why do I have to do a hard reset.
- Now that the base config has been written in the AP, there are two more lines we need to set so that we will be able to contact the device's management interface:
This will be where we need to switch cables and rely on the power blockinterface mgt0 vlan 32 interface mgt0 ip 10.11.12.2 255.255.255.0
The procedure to push this conf is simple:
– AP should be connected to a network with working dhcp.
– Power on the AP.
– Perform a hard reset: once it is powered on well, insert a small pin into the reset hole. The light will slightly blink a few times, and then stay blue.
– Let the AP boot again until light is green.
– Once the light is green, find the IP of the AP. I used nmap for this: as root:
#nmap -sP 172.28.200.1-254I use root for this as access to the MAC tells you which device it isJuPiTeR ~ # nmap -sP 172.28.200.1-254
Host is up (0.00057s latency).
MAC Address: 00:19:77:00:00:00 (Aerohive Networks)
Nmap scan report for 172.28.200.92
Host is up (0.00058s latency).
MAC Address: 00:19:77:00:00:00 (Aerohive Networks)
Nmap scan report for 172.28.200.93
Host is up (0.00056s latency).
MAC Address: 00:19:77:00:00:00 (Aerohive Networks)
Nmap scan report for 172.28.200.94
Host is up (0.00057s latency).
MAC Address: 00:19:77:00:00:00 (Aerohive Networks) - Once you know the IP, then edit the following conf to fit your needs
(change login/pass, SSID names, PSK, vlan, hive password, …)admin root-admin newadminlogin password newadminpassword
system led brightness dim
no capwap client enable
security-object Wifi1
security-object Wifi1 security protocol-suite wpa2-aes-psk ascii-key "One of your networks_PSK"
security-object Wifi1 default-user-profile-attr 30
security-object Wifi2
security-object Wifi2 security protocol-suite wpa2-aes-psk ascii-key "the other network's PSK"
security-object Wifi2 default-user-profile-attr 31 ssid Wifi1
ssid Wifi1 security-object Wifi1
ssid Wifi2
ssid Wifi2 security-object Wifi2
hive Wifi-Hive
hive Wifi-Hive password A-strong-hive-assword
interface wifi0.1 ssid Wifi1
interface wifi1.2 ssid Wifi1
interface wifi0.2 ssid Wifi2
interface wifi1.3 ssid Wifi2
interface mgt0 hive Wifi-Hive
user-profile Wifi1 qos-policy def-user-qos vlan-id 30 attribute 30
user-profile Wifi2 qos-policy def-user-qos vlan-id 31 attribute 31
interface wifi1 radio channel 44
hostname WifetteHive-AP1
save config
- Plug in the simple not tagged network cable
- ssh into the device (default login is admin, and default password is aerohive)
- Copy your conf and paste it in the terminal – don't forget to save config!
- change the management vlan: "interface mgt0 vlan 32" - Your device should look like it froze.
- close that terminal, and switch to the cable carrying tagged vlan32 (there should be a dhcp… find the devices address on that vlan) –> if you don't use a power block here, you're screwed… because pulling the wire will reset the device to last saved conf, hence erasing the "interface mgt0 vlan 32".
- ssh to the device on its new IP,
- optionally, give it a fix IP in the mgt control vlan: "interface mgt0 ip 10.11.12.7 255.255.255.0"
- save config once again.
Testing your config:
2: Check the conf with ssh, we will test with 4 commands:
$ ssh 172.28.200.94
Aerohive Networks Inc.
Copyright (C) 2006-2015

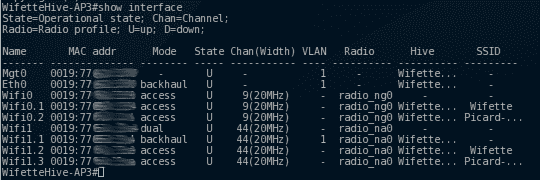
Show us the interfaces of selected AP. the important things here:
Wifi0 is in access mode, while wifi1 is in dual mode. Dual here means access and backhaul, access being the one for clients, and backhaul the one the AP's use to communicate between themselves. Here you see why numbers didn't match in the config's tricky part:
wifi0.1 –> SSID Wifette (2.4Ghz)
wifi0.2 –> SSID Picard (2.4Ghz)
wifi1.1 –> backhaul
wifi1.2 –> SSID Wifette (5Ghz)
wifi1.3 –> SSID Picard (5Ghz)

We can see all clients connected to the different SSID's of the current AP, in this case, there is one connected to wifi0.1 (thus on wifette in 2.4Ghz as we saw on the previous picture)

Here we can see that the AP's can see each other… in this case, Wifette-Hive AP3 can see 3 other access points, and they are part of the same hive.

In this case, we can see that 3 clients are connected to other access points of the hive. AP3 already has the information about these clients (thanks to the hive), and if client 3 get better signal from AP3 than from the one he is currently connected on, the device will switch from AP transparently.
Thx for help
